How To Sew Thick Vinyl by TuffSew

how to sew vinyl

It’s TuffSew again, your heavy duty sewing machine manufacturer! Sure, your standard household machine can sew vinyl. 

But what happens when you want to sew more than 2 layers? Why is your sewing machine not able to handle the extra layers? 

Remember, every sewing machine has it’s limitations. 

Here’s an analogy: Would you drive your Honda Civic to a ski resort when you knew you had to go through a snowstorm? You could…but wouldn’t be more efficient and safer to rent a car with 4WD?

Here are a few tips for sewing thick vinyl

Consider purchasing a walking foot sewing machine. 

Not a sewing machine with a “walking foot attachment.” There is a huge difference between the two.

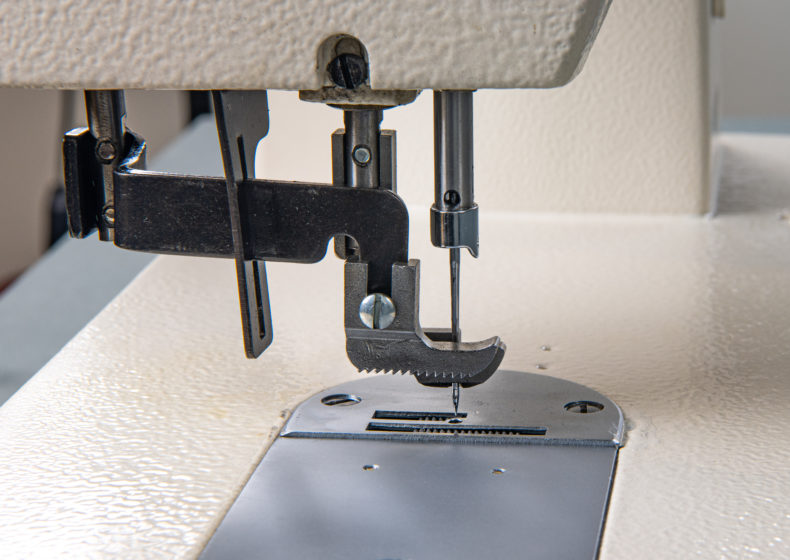
Here is a picture of a walking foot sewing machine and a true built in walking foot (the top portion): 

Make sure and increase your stitch length to the maximum while you are sewing vinyl. 

Some walking foot machines have a 5mm stitch length, others might have a 5.5mm or 6mm stitch length.

Use the largest size needle available. 

This is another reason why using a walking foot sewing machine is SO important. With standard sewing machines, the needles are thin and don’t penetrate as well. All portable walking foot machines use a much thicker needle- it’s almost nail-size! We recommend using at least size 21 needle.

If you are having a problem sliding the material while you are sewing…

Place a piece of tissue paper under the fabric.

Use a heavier type thread. 

Another great reason for using a walking foot sewing machine. Standard sewing machines cannot handle nylon bonded size 69 thread…but a true walking foot sewing machine definitely will handle that weight.

To learn more about how a walking foot sewing machine can help when sewing thick materials, see the videos below: 

If you have any further questions regarding sewing heavy vinyl material, email us at [email protected].

The TuffSew Team


How to Sew Marine Canvas

how to sew marine canvas

TuffSew here, your heavy duty sewing machine supplier. Here at TuffSew we get many questions about “How do I sew Marine Canvas?” First of all, what is marine canvas?

It’s really a phrase that encompasses dozens of materials such as acrylics, polyesters, and many coated meshes used in the outdoors. 

These materials are usually resistant to water and also resistant to harmful UV rays. You’ll see marine canvas applications used in awnings, tarps, boating materials, tenting materials and many more. Now let’s go over some tips and important things to remember when sewing marine canvas.

The Tools You’ll Need to Have

A Walking Foot Sewing Machine

First off is a heavy duty walking foot sewing machine. We recommend our Tuffsew Straight Stitch or TuffSew ZigZag sewing machine.

One of the sticking points to sewing marine canvas materials is your stitch length. 

Make sure you use a long stitch length, somewhere in the neighborhood of 5-6mm. We’ve redesigned our walking foot sewing machines to have a longer stitch length than any other walking foot sewing machine in the market today. This helps our customers sew through the heaviest fabrics.

The Right Thread and Needles

For needles, you are going to need size 18, 20, and 22 needle, type 135×17.

You’ll also need polyester thread sizes ranging from #69, #92, or #138.

Thread color? Well that depends on your level of sewing ability. If you choose a thread color that highly contrasts your material, and you are a sewing beginner, then expect to see your errors. We’ve seen some beautiful projects with highly contrasted thread/material, but make sure you can handle the added pressure of nailing those seams.

The Right Foot Pedal

Make sure you are using a foot-pedal that has speeds that are slow. You want to make sure you are in control of your project at all times. You also want to check your tension. If your material is puckering, than you have set the tension dial too high. 

If you are seeing loops in the seam, then you aren’t using enough tension. Make sure and use a test piece of material before you sew your actual project.

As long as you are using the correct type of sewing machine, needle, and thread to handle your thick marine canvas materials you can sew like you would on a normal household sewing machine. The key is, use a walking foot sewing machine….and with our longer stitch length we feel like the TuffSew Straight Stitch or ZigZag sewing machines are your best choices.

How to Sew Leather with a Heavy Duty Industrial Sewing Machine

how to sew leather

TuffSew here, your heavy duty sewing machine supplier. So, you have decided to start sewing leather. Here at TuffSew, we get one or two questions a day regarding sewing leather. 

The most important question to ask yourself is “what sewing machine am I going to use?” Let’s say you have a regular household sewing machine that you plan on using for this leather project. Will it sew your new leather project? The answer is maybe. There are many variables you need to be aware of.

First, your household sewing machine takes a maximum needle size of 19. Will this handle some leather? Yes, it will. But that size needle is pretty thin….and will only work on SOFT leather products with thicknesses from 1/16″ to 1/8″.

One of the biggest problems people have when using a household sewing machine for leather is they think they can sew 1/4″ thick or greater. If you do this, chances are you will break needles, skip stitches, and stall out. If you truly want to learn how to sew thick leather up to 1/4″ thick, make sure to research machines such as our Straight Stitch Industrial Portable Sewing Machine for leather.
 
TuffSew Straight Stitch Walking Foot Sewing Machine
 
The Straight Stitch can take up a size 23 needle! This size needle looks and feels like a nail…and will penetrate your leather projects very efficiently. This machine is manufactured with a built in walking foot. 

This walking foot will grab your leather material from the top and the bottom…evenly feeding your thick material through the sewing process. Here is an image of the walking foot:
Built In Walking Foot
 

And here are the 7 additional tips when sewing leather:

1) Don’t buy the most expensive leather the first or second time you sew leather. 

A lot of times you can find scrap leather from a local dealer at very high discounts. Remember, practice makes perfect. Learn how different thicknesses of leather need different needle types, sewing speeds, and varied lengths of stitches.


2) Find a knowledgable leather supplier, someone you can trust. 

Give them detailed instructions on what your application or project is, and ask them what they recommend you use.

3) Use a rotary cutter to cut your leather skins. 

You should also be using some weights to keep your material in place while you cut.


4) Sewing Leather takes time, slow down. 

If you don’t have enough time for your project, then don’t start it. Manage your time and start back up when you can give 100% of your attention and effort to your leather sewing project.

5) You can press leather with an iron (other side of hide).

6) Don’t use pins on leather as they leave holes. 

Ask your leather provider about clips.

7) If you are sewing 1/8″ thick or greater, make sure and use a presser foot that is grooved. 

The TuffSew Straight Stitch Machine has this grooved presser foot. The feed dogs are also grooved. This will give you the benefit of true grip when you are sewing. You want to be in complete control when sewing thick leather- so make sure and get the right machine for the job. For more information regarding this machine, please visit: Walking Foot Sewing Machine for Leather.


Lastly, here is a YouTube video on some advantages of using a walking foot machine for sewing leather or other thick materials:


Click for more information about our: TuffSew Portable Walking Foot Sewing Machine.
 
The TuffSew Team

What Tools Do I Need to Sew Canvas for Boating Projects

how to sew canvas

Before you start diving into do-it-yourself canvas sewing work on your boat- you need to make sure you have all the right tools for the job. You are going to need a heavy duty sewing machine, some thick needles, some thread, a good pair of scissors, and material. 

You don’t need to be alarmed and go buy a $1,200 dollar sewing machine. A simple walking foot sewing machine with a built in motor will do.

We recommend our TuffSew Straight Stitch 9” heavy duty walking foot sewing machine for all of your sewing projects. There are two different size TuffSew Straight Stitch machines. One has a 7” gate the other has a 9” gate. The gate is essentially the amount of horizontal working space from the left edge of the sewing machine to middle base of the machine. 

We strongly encourage you to use a machine with a longer 9” base-it will certainly make things easier on your when sewing canvas. To learn more about this sewing machine, please click on the video below:
 
http://www.youtube.com/watch?v=HN-ewDgw8V4
 
Let’s get to material. You have primarily 2 choices at this point. You can go with the standard in the industry “Sunbrella” which is acrylic – or natural canvas. We do recommend using Sunbrella however the price is 2-3 times higher than natural canvas.

Next on to the recommended thread! If you are new to sewing it’s important to use the same color thread as your material. You certainly don’t want to show off your errors. Light colored thread on top of dark material does look fancy- if you are up for the challenge. 

The type of thread you want to use is polyester based 69 or 92 weight. A simple google search will place in on websites where you can order all different colored threads for your particular project.

Needles and the correct sewing machine are next and the most important topic on this article. The following hypothetical situation happens daily… So you are excited….let’s say you bought your Sunbrella material, bought a great pair of new scissors, and bought your brand new 69 colored thread. 

You wake up early one Saturday and take out your regular household sewing machine and needles. You start to sew…but the needle not only won’t penetrate ¼” thickness of material, and the needle starts bending and then they keeps breaking. DON’T PANIC! It’s not you.

You just need to realize you are not using the correct sewing machine and needle. You need to use a 135×17 needle size 22. These needles are like nails and will penetrate up to 3/8” thickness of canvas. 

You also need a walking foot industrial style sewing machine to hook these needles into. Once you have the right sewing machine and needles….your sewing project will come alive.

It’s important to find a heavy duty walking foot sewing machine for sewing canvas. Click to learn the other benefits to using the TuffSew Walking Foot Portable Industrial Sewing Machine.

As always, if you have any further questions- please don’t hesitate to email me at [email protected]. I get back to all emails within 24 hours.
-The TuffSew Team-

How to use a Heavy Duty Walking Foot Sewing Machine for Upholstery Fabric

how to sew upholstery

The myth is over. Sewing upholstery is no different than sewing regular fabrics. The only difference is with the equipment and consumables you will use to tackle your thick upholstery projects. 

Thicker upholstery fabrics require you to use heavy duty walking foot sewing machines equipped with thicker thread such as 69 nylon bonded thread.

Why? Heavier material needs to be held together by heavier thread and stronger stitches. You will also need industrial grade sewing needles when working with upholstery. Normal needles will bend or break when trying to penetrate upholstery. Make sure and use sharp scissors to cut through your thick material.

Also when sewing upholstery you will also need to include backing, which requires you to use a portable walking foot sewing machine to handle this weight. You can’t use a heavy duty thread and an industrial grade needle on a regular household sewing machine. 

Make sure and use the correct machine for your sewing needs-otherwise your project will look inconsistent. 

Now on to how to sew upholstery:

Inspection  

First examine your material. 

Take your sharp pair of 6-7 inch scissors and trim all the worn out or frayed edges of your material. Make sure and cut just enough. There is no reason to cut excess material that is in good shape.

Sewing Machine Setup: 

Medium Stitch Length. Mid-Range Tension.

Pattern Pile or Nap: 

You want to determine if your material pieces have a nap. Don’t know what a nap is? Imagine brushing your dog’s hair down, when it’s neat and shiny. And then imagine brushing it the other way and you’ll feel and see the resistance. Make sure all your upholstery pieces are facing the same way-nice and shiny. This will affect your end esthetic result.

Double Check Equipment: 

Make sure you are using a portable walking foot machine. Make sure and use a size 18,20, or 22 needle depending on thickness of fabric and sewing machine recommendation. Make sure you are using nylon bonded 69 thread.

Upholstery Placement: 

Most built-in walking foot sewing machines have a 3/8” lift which allows you to put more material under the presser foot. You always want to leave a little seam allowance. Make sure and place the raw edges right on top of eachother while the right sides together.

Sewing: 

Start sewing normally as you would with a regular household sewing machine. If you have some loosely woven fabric that might unravel, finish the raw edges with a serger. If your project doesn’t have backing, you’ll need an extra seem so it doesn’t unravel.

For more information on portable walking foot machines which are built to sew heavy duty upholstery fabrics, click here: http://www.tuffsew.com/straight-stitch-industrial-walking-foot-sewing-machine

Using a Heavy Duty Walking Foot Sewing Machine for Thick Fabrics

sewing walking foot machine

TuffSew here, your heavy duty sewing machine supplier. Whether you are a sailor, upholster, or leather shop owner- it’s important that you understand the importance of using the right sewing machine for your heavy duty projects. 

One example is a sailor and his or her understanding that most new boats are going to need a ton of canvas or brightwork done over the years.

It’s important for you to use a quality walking foot sewing machine that is easy to use, reasonably priced, durable, rugged, dependable, and has years of success. Here are the most important benefits to a walking foot sewing machine when sewing heavy duty fabrics such as leather, canvas, sailcloth, upholstery materials, strapping and more:

Sewing Thick Fabrics with a Walking Foot Sewing Machine

The Walking Foot

When you use a heavy duty industrial walking foot sewing machine- it comes with a built-in walking foot mechanism. This is very different that most walking foot attachments that only snap-on regular household sewing machines. 

This built-in walking foot will evenly feed your material as it grabs (with its traction like grip) the top of your material. This built in walking foot works in conjunction with the feed dogs which pull the bottom piece of the material through the sewing process.

straight stitch sewing leather

Higher Foot Lift

Most built-in walking foot sewing machines have a 3/8” lift which allows you to put more material under the presser foot. You can comfortably sew most heavy duty materials under the presser foot because of the walking foot assembly.

Built in walking foot sewing machine

Portability 

This is a huge concept for boating enthusiasts or anyone who needs to transfer their sewing machine from place to place. Most walking foot machines are roughly 35-40 pounds, depending on the size (7” or 9” gate) of the machine. Feel free to take your walking foot sewing machine anywhere as it’s easy to grip underneath the head of the machine. There are many cases available for this type of sewing machine as well.

Cast Iron Body and Metal Parts

All walking foot sewing machines come with a cast iron finish and all metal working parts. Metal gears and parts will last much longer than any sewing machine with plastic gears and parts. Plastic gears and parts crack and break down quickly. Having a cast iron body proves to be much more durable than plastic bodies. If the machine drops, it will not shatter into 100 pieces. Durability is much higher with a walking foot sewing machine.

Electronic Foot Control

All walking foot sewing machines come with an electronic foot controller. You can control your speed better with this type of foot controller. You want to use a long foot controller cord, if possible. Most walking foot sewing machines come with a longer cord.

Warranty

You want to make sure you are buying your walking foot sewing machine from a trusted source. You want to buy from a company who has been in business for several years. Usually a warranty or a store credit is what you should be looking for. You want to find a machine with a 1 year parts warranty in case you drop your machine. You want to look for a supplier with a 3 month labor warranty.
For more information click to learn more about this walking foot sewing machine.

How to Sew Thick Material and Multiple Layers by TuffSew

how to sew thick material

TuffSew here, your heavy duty sewing machine supplier. Whether you sew because it’s your hobby or your livelihood, it’s important to continue to learn different concepts and techniques along the way. 

Sewing begins to be a challenge when you decide to start tackling multiple layers of material underneath your presser foot. After reading this article, you should be better suited to handle situations when you must sew thick materials.

First you need to ask yourself “What type of sewing machine am I working with?” This is extremely important because every sewing machine has its limitations. If you are using a regular household sewing machine, the following 3 tips will help you:

1)      Do you need all that additional layer lining? Probably not. Cut off the excess (especially for side seams) but make sure not to break the actual stitching.

2)      Use the largest size needle acceptable for your sewing machine. Usually a size 18 or 19 needle will allow you to penetrate the multiple layers more effectively.

3)      In situations when you are breaking needles –maybe you are sewing a strap for a purse- use the hand wheel alone.

Those tips didn’t help? Still breaking needles? The problem is not you or your domestic sewing machine-it’s the capabilities of the machine. It’s time for you to start looking into more of an industrial grade sewing machine. 

Portable walking foot industrial strength sewing machines will stand a much better chance of completing your thick sewing projects. 

We recommend our TuffSew Straight Stitch machine, you can view it here http://www.tuffsew.com/straight-stitch-industrial-walking-foot-sewing-machine. Here is a video with more information on this type of sewing machine:

To go over the details of the above video. Walking foot industrial strength sewing machines will help you sew thicker fabrics because:

1)      You can use larger needles- up to 22 or 23
2)      There are “grips” on the walking foot and feed dogs, which help pull the heavy fabric through the sewing process
3)      You can use nylon thread and thicker weighted thread in general- giving the stitching in your final project much better strength and life duration
4)      More power- more RPM’s and torque equals better results when sewing heavy fabric
5)      More durability- all metal parts and cast iron construction will give you a machine that lasts much longer than plastic parts and construction
If you are interested in understanding more about sewing thicker materials, feel free to stop by our website at www.tuffsew.com.

Seven Important Tips when Sewing Leather by TuffSew

sewing thick leather

TuffSew here, your heavy duty sewing machine supplier. Sewing with leather can be very difficult and unforgiving if you make any mistakes. 

Many people ask us for sewing tips when working with leather products. Here are seven basic suggestions which will help you when sewing a type of material unlike any other. 

7 Tips When Sewing Leather

Make sure and examine your leather before you actually mark out your pattern. 

Sometimes there may be a small hole or slight imperfection in the hide. You certainly do not want to get to the end of your project and then see a small tear in your new leather purse. Imperfections are normal because the hide was once on animals who lived in the wild where scarring is a normal occurrence.

You can’t really pin leather-use pattern-weights. 

These weights will keep your material locked in place like a pin would. We recommend cutting leather with a sharp pair of heavy duty scissors or a sharp rotary cutter. That’s the safest way.

Use the correct sewing machine for your needs. 

A normal domestic sewing machine will sew lightweight garment leather. Usually you can sew up to 1/8” thickness on this domestic machine. Using a walking foot attachment or Teflon presser foot will help.

If you’re sewing leather products over 1/8” thickness, you are going to need a portable walking foot sewing machine that can actually handle what you are trying to accomplish. 

Your best bet is a walking foot industrial sewing machine. We recommend our TuffSew Straight Stitch machine.

5)      You need to use a size 20 or 22 needle to penetrate thick and coarse leather. 

A domestic sewing machine can only take up to a 19 needle. These special leather needles will be the difference in an “A+” result versus a “C” result.

6)      Make sure and use nylon weighted thread, not cotton. 

It’s stronger and will last much longer.

7)      Skipping stitches is always an issue when sewing leather. 

Why? Well, first off, are you using the correct sewing machine? Look at tip number 4 above. You might be encountering uneven bulk under the presser foot or seems coming together. Make sure you are using a brand new sharp size 22 needle with your built in walking foot sewing machine. 

The sharpness of the needle will penetrate properly, and the built-in motorized walking foot will help feed the fabric properly.

Remember, if you are sewing thick leather, look into a walking foot sewing machine. Here is another article you can reference if you need information on a sewing machine for leather.
If you are interested in understanding more about sewing with leather, feel free to stop by our website at www.tuffsew.com

7 Steps to Threading your TuffSew Industrial Walking Foot Straight Stitch Sewing Machine

threading your tuffsew

Tuffsew here, your heavy duty sewing machine manufacturer. So you got yourself a TuffSew Straight Stitch…or perhaps another type of portable industrial walking foot sewing machine. Now you are wondering how you are going to thread your new beast of a sewing machine.


You’ll notice when you first receive your TuffSew Straight Stitch that it will be all threaded and ready to go. But what happens 2 weeks later when you want to change the thread color? Now it’s time to do it yourself. But don’t worry, we have the steps right here…along we a handy video.


Steps to Threading Your TuffSew Walking Foot Sewing Machine:

BOBBIN SPINDLE

Take the thread off the bobbin spindle.

WRAP AROUND THREAD GUIDE

Put the thread on the front thread guide (wrap it around in the natural form. You might need to watch our YouTube video for this step. The video is attached to the bottom of this article).

3 HOLE THREAD GUIDE

Take the thread and go DOWN the right hold of the thread guide. Then take the thread DOWN the left hole.

Before the next 2 steps, make sure the presser foot is UP. That is the black assembly on the left side of the ceiling of the machine.

TENSION DISC

Take the thread down near the tension disc. You want to make sure you go IN BETWEEN the metal tension discs. There’s one tension disc with a tongue on it. You want to put the thread right in front of this tension disc. Floss the thread through the tension disc from right to left.

TAKE UP BAR

You’ll notice when you floss the thread through the tension disc that the thread pulls up the spring. It will click! You will then thread the take up bar from RIGHT to LEFT.

NEEDLE MECHANISM GUIDE

Snip your thread first, it will make it easier. This is the last thread guide before you thread your needle. This thread guide is right above your needle. You want to thread this guide from RIGHT to LEFT only.

THREAD YOUR NEEDLE

First drop the presser foot down which will give you more room. Always thread the needle from LEFT to RIGHT only. Bring the presser foot back up. Next turn the handwheel 1 complete turn counter clock wise. 

This will pick the thread up automatically so that you have both threads to the top! Now you are ready to sew.
If you need some visual assistance, below is a video to help you with threading the TuffSew Straight Stitch:
 
https://www.youtube.com/watch?v=xYQwf-QTMjU
 
If you have any further questions on maintaining your sewing machine, feel free to email us at [email protected]
If you are interested in learning more, go here: industrial portable walking foot sewing machines and check the Stitch and Sew’s beginners guide to sewing if you just begin.
-The TuffSew Team-
 

How to Maintain Your Portable Walking Foot Straight Stitch Sewing Machine by TuffSew

So you just purchased a walking foot sewing machine, maybe even our TuffSew Straight Stitch. Congratulations!!  If you did in fact order our TuffSew Straight Stitch, you will notice that your machine will be all stitched in, ready to go upon arrival. 

The tension is set, the needle is placed, and a sample material has been sewn already. So you crank out all your initial sewing projects- but now might be wondering “how do I maintain this machine now?”

The first item we’d like to discuss is oiling the machine. This TuffSew Straight Stitch machine is a portable walking foot sewing machine. It does not sit in a bed of oil like full sized industrial sewing machines do. 

Therefore the Straight Stitch needs to be manually oiled every month. Just like in the YouTube video below, simply tilt the machine on its back (careful it’s heavy) and oil all the moving joints. You can use the oiling tube that came with the machine. As you turn the hand wheel you can see all of these moving joints-simple as that.

Tension is another issue we combat. You’ll see the circular tension knob on the machine with numbers on it. Before we shipped your new TuffSew machine out to you-we calibrated the machine and set the tension to 5. 

Always make sure you have the tension set to 5. If you are deciding to sew light-weight materials on our Straight Stitch machine-feel free to lower the tension a little bit. However, when you are done sewing the light weight materials make sure and reset the tension knob to 5.

We also get a lot of questions on needle insertion. So you want to change the needle or take it out-no problem. Simply loosen the black set screw on the side needle mechanism 1/2 turn. Then you can drop the needle down and take it out. Make sure when you replace the needle that you notice there are 2 sides to our needles. 

One side has a long 1” groove on the side of the needle. The other side of the needle has a little scarf on it. When you put the needle in the machine you ALWAYS want to make sure the long 1” groove is facing the left side of the machine.

 You can feel the groove with your fingernail. Remember if you put the needle in backwards-the machine won’t sew L.

If you have any further questions on maintaining your sewing machine, feel free to email us at [email protected]

If you are still on the fence about ordering a TuffSew Straight Stitch, see our TuffSew Reviews page.